When working with text in Adobe InDesign, it’s common to want certain words or phrases to stand out. One style trick you might use is bolding all text that appears before a colon, especially in layouts like catalogs or resumes, where headings need clear visual separation. But rather than manually formatting each section, you can automate this using GREP in Adobe Indesign, a powerful search-and-style tool.
In this blog, I’ll show you how to use a simple GREP code to automatically bold everything before a colon. We’ll go over the GREP expression you need, explain how it works, and then guide you through applying it to your text.
What is GREP in Adobe InDesign?
GREP (Global Regular Expression Print) in Adobe InDesign is a way to find patterns in your text and apply formatting to them. With GREP, you can automate complex formatting tasks. In our case, we’ll use GREP to find everything before a colon and apply a bold style, saving you from manually bolding each section.
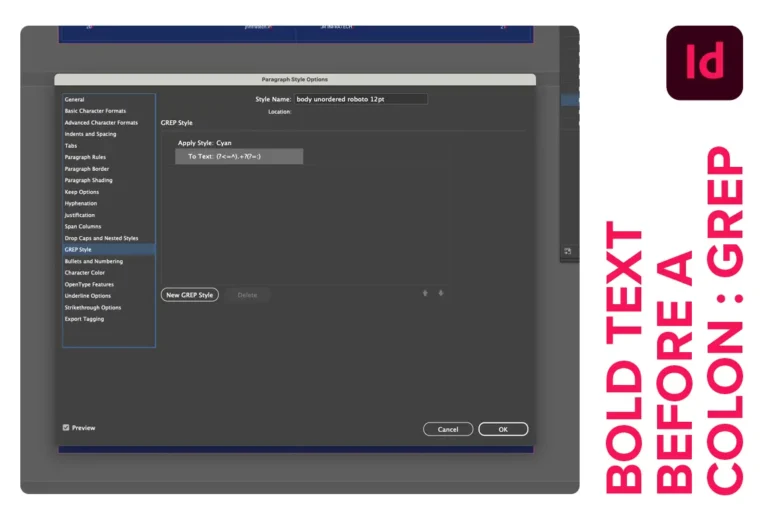
The GREP Code for Bolding Text Before a Colon
Here’s the GREP expression we’ll be using:
(?<=^).+?(?=:)
Let’s look at how this works and what each part means.
Breaking Down the GREP Expression
The GREP expression (?<=^).+?(?=:) may look complex, but each part plays a specific role in targeting just the text before the colon.
.+?: This part is what actually captures the text.- The
.represents any character (letters, numbers, symbols). - The
+means "one or more times," so it grabs one or more characters in a row. - Adding
?after the+makes it a "lazy" match, so it stops at the first colon it finds instead of matching everything in the paragraph.
- The
(?=:): This is called a "lookahead" and specifies that our match should stop right before a colon.- The colon
:inside the lookahead tells the GREP expression to stop capturing text when it encounters a colon, but without including the colon itself in the bold formatting.
- The colon
So, putting it all together, this GREP expression matches any text from the beginning of a paragraph up to, but not including, the first colon.
How to Apply This GREP Style in Adobe InDesign
Now that we understand the code, here’s how to use it in InDesign.
- Open GREP Style Settings:
- In your InDesign file, open the Paragraph Styles panel.
- Create or edit a paragraph style, then go to GREP Style in the Paragraph Style options.
- Create a New GREP Style:
- Click New GREP Style and select a character style that applies bold formatting (or create one if you don’t have it already).
- Apply and Review:
- Click OK to save your settings.
- Now, InDesign will automatically apply bold formatting to any text before a colon in paragraphs that use this style.
Additional Tips for Using GREP in InDesign
- Experiment with Different Formats: You’re not limited to bolding text; you can apply any character style you’d like, including italics, colors, or custom font choices.
- Test in Real-Time: GREP Styles allow you to preview changes as you work, so you can see the effect instantly.
- Use Multiple GREP Expressions: You can add multiple GREP expressions within the same style to automate several types of formatting at once.
- Want to learn more about GREP in InDesign: How to Master Text Automation for Designers
By using GREP, you can simplify repetitive formatting tasks and keep your designs consistent. The code (?<=^).+?(?=:) is a quick and effective way to bold any text that appears before a colon, whether it’s for headings, labels, or structured text. GREP in InDesign opens up a world of styling possibilities, helping you focus more on creativity and less on tedious formatting!